Tuesday, December 31, 2013

Mini Z

If you wanted a tiny reproduction Zig Zag chair for your desk, Vitra has been making one since the early 90’s. They’re all over Google if you want one. Price: $180 (more than my full size chair will cost!).


Friday, December 27, 2013

Tapering off

Now it’s time to trim all 4 pieces to their proper widths. One of the things that make this a complicated build are all the angles used. It would be one thing if the seat was just straight, but 3 out of the 4 pieces have a taper to them. The back is the only piece that is not tapered.

To cut the pieces it’s a pretty easy job on the table saw. The first thing I did was dry fit the seat to the back piece. I started with the seat, since it was square, with no taper. I will base all the other cuts from this piece. 


The back and seat fit together snug, and stay in place. All I had to do is mark a line from where the back meets the seat, to the front of the seat. Then I’ll draw the taper from the seat to the center piece, and follow that same procedure for the bottom foot section.


Next step is to bring out my sled. This sled is nothing more than a flat piece of birch plywood that has a runner underneath it that fits in the track on the table saw bed.  I’ve put two hold down clamps on the back of the sled, and after aligning the marked lines I clamp the wood down.


Front looks good.


Back looks good.


Cut came out nice.


Here’s a photo of the base piece after being tapered.


All 3 pieces are now tapered.


So far so good….

Friday, December 13, 2013

Making the grade

Next step is cutting the four pieces to their proper length. This is quick and easy, only requiring the table saw sled to cut them to perfect 90 degrees. 


 Now that the length is set on all of them, I cut the width of just the seat back to it's finished size. Later on you will see why I started with this.


I mark the width, check the alignment with the blade, then cut both sides.


 So far so good.

To make the two 45 degree angles for the chair, the three pieces that come together with this joint need to be cut to exactly 22.5 degrees each. This is an extreme angle to cut on the table saw and requires some set up. 


I started the project with a total of ten fingers and I’d really like to complete the project with no less than ten fingers.

 So, I’m going to use a box shaped guide that rides on my table saw fence. It is made from MDF, and will hug the fence, allowing the board being cut to ride at 90 degrees without any wobbling. It will support the wood, keep it tight against the fence and table, and most importantly keep my hands far away from the saw blade. 


 Most other pieces have dried, just one more to set in place...


It looks like a tunnel of glue!

(6 hrs. later) The glue on the guide box has dried, and now I can proceed with the cut


The blade is adjusted again to 22.5 degrees.


Always mark the board to be cut, and double check to make sure it's the correct angle, on the correct side of the board. Not a time to make a mistake! I clamp the first piece, and make sure it will run flat against the table, and check everything again. It looks good. Time to cut...


This picture shows the board after the cut has been made. Two clamps kept it firmly in place.


The result- nice sharp cuts!


I took the three pieces and placed them on the ground, and taped them together just to see if the parts are looking correct. Looks ok to me. Next step: tapering the pieces!


Tuesday, December 10, 2013

Variations

The Zig Zag Chair did not represent the same kind of breakthrough in the history of twentieth century design as did the Red Blue Chair. Within Rietvelds’ oeuvre, however, this design is the purest example of the synthesis between form, function and construction that was his aim. The Zig Zag shape does not contain space but dissects it with its four planes: back, seat, leg and base. Each of the planes is essential to the construction.

Rietveld said about this chair that “…it is, as it were, a tiny partition in space untouched. It is not a chair but a designers’s joke. I always called it the Zig Zag”.

A number of features that Rietveld had tried out in earlier designs converge in the Zig Zag Chair. The shape derives from the chair without back legs that was a remarkable phenomenon in the development of tubular furniture. The German designer, Bodo Rasch, was the first to make a fairly old fashioned wooden chair that was based on a Z shape. That was in 1926. In 1932 Rietveld designed a model for Metz & Co., with a tubular metal frame; a number of prototypes were shown in 1933 at the “Op het dak” exhibition in the cupola of Metz & Co. in Amsterdam. The structure turned out to be inadequate. Where the legs crossed the weld was not sufficiently strong. Because of this the model had no successors.

 
An early design that led to the current Zig Zag

(Not such a strong weld, not a good design)


Rietveld regarded the Zig Zag chair as a variation on the one-piece chairs that are sketched in the drawing appear to have been made out of a single piece that was then bent. Another drawing in the Netherlands Architecture Institute with the caption ‘steel plate’ confirms this. As far as we know, Zig Zag Chairs made of steel plate were never produced. One of the earliest, possibly the first, prototype of the Zig Zag Chair was made of fibreboard that was fastened with screws to an iron band. A second prototype that must have been made more or less at the same time consisted of four pieces of plywood that are fixed to a frame of sawn-out iron. In a review by Mart Stam about the exhibition of chairs in the Stedelijl Museum in Amsterdam (1934-1935) both production possibilities were in one breath: “He (Rietveld) is thinking of metal, of vulcanized fibreboard. He knows that the old way of working is no good anymore; he knows that what he needs to do is to find new materials with another and more simple form of assembly”

The versions that were closest to Rietveld’s original idea were the Zig Zag chairs made of curved five-plywood. They were made by Metz & Co. and were illustrated by a brochure for 1938. A description of the production method is noted; “Chair made from one inch deal cupboard planks from Bruynzeel of Zaandam, 183 x 40 x 2 of good quality and well dovetailed and glued with heated up jointers glue”. In the course of time some alterations were made to the chair, the later versions having the joint of the back and seat was reinforced with long screws and bolts. 

During the 1930’s and 40’s Rietveld devised a number of variations on the Zig Zag chair. Some had arm rests and holes in the back, some were different in terms of size and construction.


 To me this design really starts to show what the curent Zig Zag design looks like today.


 This looks like a mid 70's interpretation!


 This is a favorite; for the design minded baby, who has to have cutting edge seating!


As far as the finished applied to the chairs, after a number of tests Rietveld settled on using a layer of transparent varnish on the surfaces. Some of the chairs were painted a color all over, with the edges left as untreated or painted white. To this day Cassina makes version like this, using colors such as blue, black, red, and white with the contrasting edges.

Saturday, December 7, 2013

Angles of attack

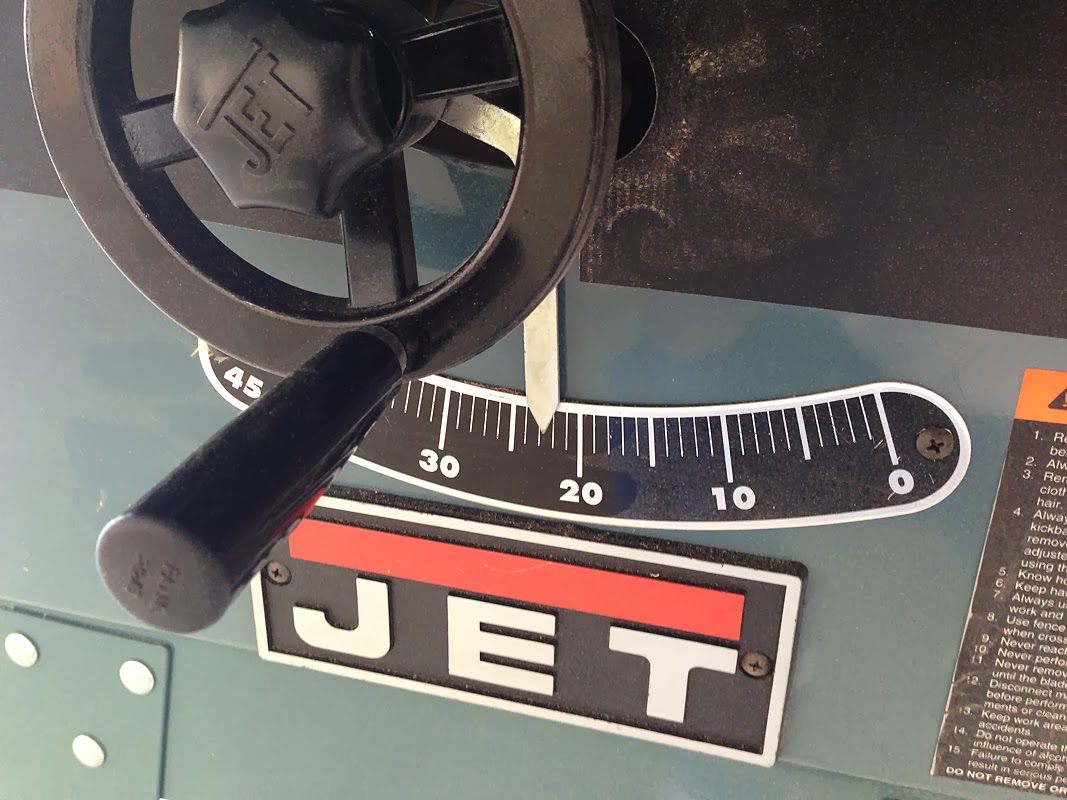
Now time to cut some angles and finger joints. The two angled cuts need to be done at 98 degrees. This joint is where the seat and back come together. This is super quick and easy. I just set the table saw at 98 degrees, and make the two cuts.


Ta da! Finished already. Look at those sweet 98 degrees in all their glory!


Now I know what you’re thinking, sheesh, this chairs seems to be coming together pretty easily. It doesn’t look too hard does it?

WARNING: The above steps is ridiculously easy. Things from this point on get difficult. Way difficult. If you have young children, or are the nervous type, now is your time to erase this bookmark, and maybe go here.


Next step; I'm going to cut the joint where the seat and back come together. The Cassina version uses a dovetail joint, but since I have no (expensive) dovetail jig for my router, I will be using a finger joint. I've set up an old sled (previously used for dado cuts) and made a few modifications to it.


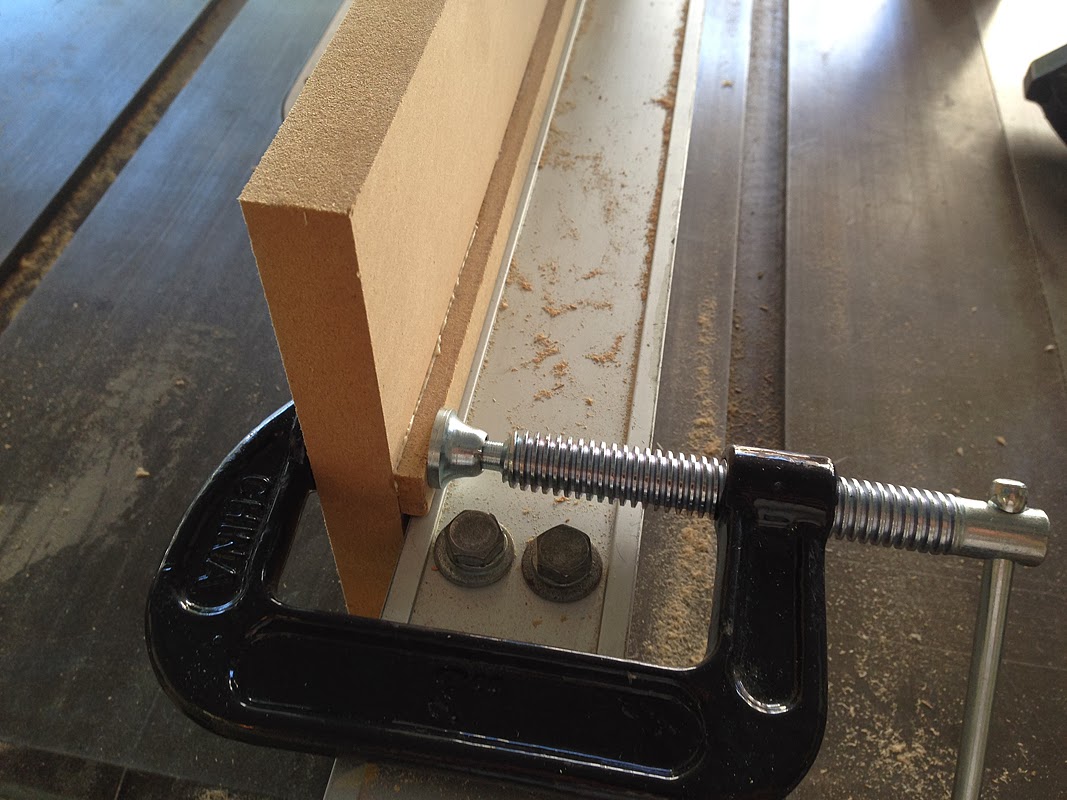
So what I've done is take 2 pieces of MDF, cut a 98 degree angle on one edge of each piece, glued them together, and then glued them to the sled.


So you can see here what they look like from the side. These two pieces are supported by a few other pieces of MDF glued to the sled.


Now I get my dado set out, and install the blades and cutters.


 Ooooooo, look at that, it looks like an angry shark ready to rip something apart.


Now I lay out the areas to be cut. 


I made a test cut, and it's perfect! No kidding, first cut with the dado's and it came in perfectly. This rarely happens.


I put the first piece in place, and check the alignment carefully.


I made the cuts, and they look good. Nice sharp edges too. 


I put the baord back in place to show how it was cut; I had C clamps on either side to make sure the piece did not move when being cut. 


Using the cuts in the first piece, I laid it on top of the second piece and traced the areas to be cut. This is the back piece of the seat, and these joints are wider. It will take about 1.5 passes with the dado set for each cut to create the right width.


Now all the cuts have been made. So far so good. Here's a word of caution: when making these cuts it is VERY important to carefully mark out the front / back of each piece, and triple check where you are cutting. At this point it would be very bad to accidentally make a cut on the wrong side, or a wider cut when it should have been narrow. "Measure twice, cut once".


I fit the pieces together, and a few of the cuts were just a hair off, so I had to sand some areas. An hour later and they fit great; nice and snug, but not too tight.


Here's how it looks from the side. A nice clean fit, and looking great at 98 degrees. This is a relief. This step was difficult and nerve racking. But now we can go do a few other things that aren't too challenging.